This section walks through an example, step by step, on how to create a simple report. Using the AddressBook2 database created earlier, we'll generate some birthday announcements to send to all our ``friends'' and ``family members''. In our scenario, we want to generate two types of reports. First, we want a listing of all the people we want to invite to the party. This listing will contain the following columns:
Secondly, we want to generate a postcard for every ``Family'' or ``Friend'' that appears in our database.
As mentioned earlier, the first step is to display the reports window as shown in figure 7.3. At the top of this window is an entry for you to specify the report title. For our report, we'll add a title ``Elaine's 30th Birthday Party!!'' as seen in figure 7.4.

Figure 7.4: Entering a report title
The second step to creating a report is to select those records from the database that you want to include on your reports. (If you've already read chapter 4 on ``Searching'', this information will be familiar to you.)
![]()
Figure 7.5: Entering your search criteria
Click the ``New'' pushbutton (see figure 7.5) to create the search criteria. The familiar expert search window will appear as shown in figure 7.6.
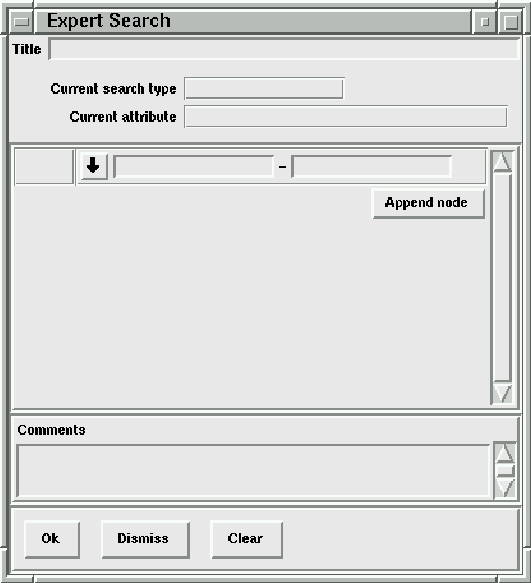
Figure 7.6: Expert search window used to capture your search criteria
For a detailed discussion of how to use this expert search window, please refer to section 4.5. In our scenario, Elaine is celebrating her 30th birthday. So, we want to send out invitations to all ``friends'' and ``family'' (Its a really big party!!) For this search criteria, we want to restrict our report to those records where Relation = ``friend'' OR Relation = ``family''.
Enter a title on the expert search, for example ``Elaine's Birthday Invitation''. Then, click on the down arrow to display the

Figure 7.7: Enter the search criteria for Elaine's party
window shown in figure 7.7. Choose the ``Parse'' radiobutton and then click the ``Attribute down arrow'' button to view a list of the attributes defined in our AddressBook2 schema. From this list, use the scrollbar to scroll to the bottom. You should see the ``Relation'' attribute. Click the Relation row to select that attribute. Remember, the relation attribute can be one of ``Family'', ``Friend'', ``Bus.'' or ``Other''. Now, position the cursor in the entry field and enter the value family , friend.
The criteria family , friend tells nxqddb to return only those people whose relation radiobutton was selected as either ``Family'' or ``Friend''.
If you want, you can enter text in the comments field to help you remember your search. Since this search was such a simple one, comments may not be necessary; however, many users still like to add comments for documenting their search criteria.
Click the Ok button to save your entered search criteria and return back to the ``Reports'' window. If you click the ``Dismiss'' button, nxqddb will disregard your search criteria and return you back to the ``Reports'' window. Clicking the ``Clear'' button simply erases all of your input on the ``Expert Search'' window for you to start entering your criteria from scratch.
When you return back to the ``Reports'' window, you'll notice that the report title entered on the ``Search Criteria'' window, ``Elaine's Birthday Invitation'' appears in the label just to the right of the Edit, New and Del pushbuttons. Immediately to the right of the pushbuttons is the number ``1'' to denote the report. You can define any number of search criteria per report using the ``down arrow'', ``Edit'', ``New'' and ``Del'' buttons. However, for our scenario we just want to produce one search criteria to invite family and friends to Elaine's party.
Click the ``Results format'' button to bring up the Column definitions window shown in figure 7.8.
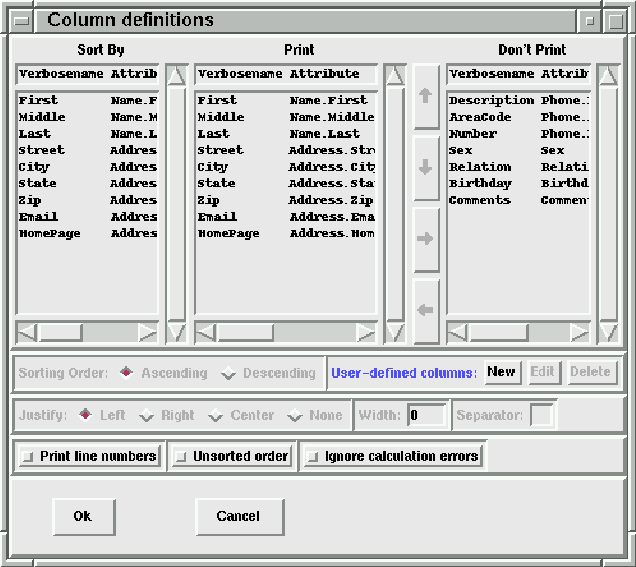
Figure 7.8: Window to define the report's columns
If this window looks familiar, then you've obviously read the chapter on searching or have been experimenting with nxqddb on your own. For details on how to operate this window, please reference chapter 4. For our announcements, we want to be sure to include the following attributes:
In order to produce letters or postcards within nxqddb, you must include those fields in the column definition that comprise the destination address. See chapter 5, for information pertaining to the configuration of the destination address.
If you omit one or more fields from the column definition that is setup in the destination address, nxqddb will stipple the (1) postcards, and (2) letters checkbuttons that allow you to generate these mass mailings.
Additionally, if you decide to generate E-mail, you must be sure that the Email attribute (configured from the ``Configure/Report Format Defaults/E-mail'' option) is also defined.
Since we're only generating a mailing list, we really have no need to produce any statistical information from our columns. In fact, since the listing options work only on numeric columns (i.e. those attributes defined with type ``integer'' or ``real''), we couldn't produce this information with our AddressBook2 database even if we wanted to. Remember, our AddressBook2 schema did not define any fields with type ``integer'' or type ``real''.
In our scenario, we want to produce a listing and postcards. The ``Listing'' checkbutton is turned on by default.
 As a visual clue, you know that a checkbutton is
turned on when the tiny checkbutton square is the color red and is
sunken.
As a visual clue, you know that a checkbutton is
turned on when the tiny checkbutton square is the color red and is
sunken.
Since the ``Listing'' checkbutton is likely already turned on, you shouldn't need to click this button.
Click the Postcards checkbutton to tell nxqddb that you want to generate postcards.
The Postcards and Letters checkbuttons will be available only
if you've included every attribute in your ``Results Format''
that also appears in the destination address. That is,
nxqddb compares your default destination address setup to
the fields that you specified in the ``Results format'' operation
where you specified the column definitions. If there is one or
more fields in the default destination address that do not
appear in your column definitions, then nxqddb will not allow
you to produce postcards or letters. This safety check
helps to prevent you from creating invalid mailing addresses.
Remember, you set up the destination address from the ``Configure/Report Format Defaults''
menu.
From the ``Reports'' window, there is a setup panel with pushbuttons to allow you to customize the content and layout for (1) letters, (2) postcards, (3) E-mail, (4) graphs, and (5) barcharts.
For our scenario, we only want to produce a listing and postcards. So, let's setup our postcard invitations. Click the ``Postcards'' button to display the ``Postcard Message'' window as shown in figure 7.9.
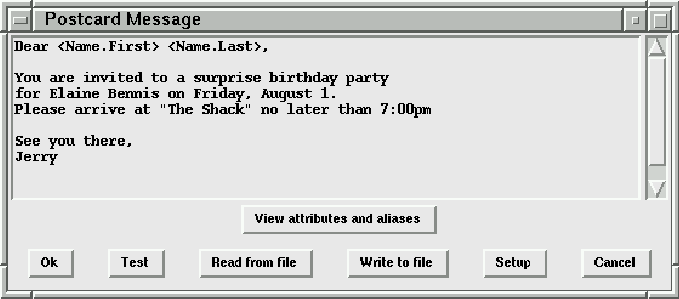
Figure 7.9: Window to enter postcard message
Create your custom postcard message by entering the appropriate text in the text entry(see figure 7.10).
Dear
Figure 7.10: Sample postcard message for Elaine's Birthday Party
To avoid silly input errors when creating your postcard
message, nxqddb provides a ``View attributes and aliases''
button to allow you to conveniently paste the attributes
into your message entry. To do so, follow these steps:
(1) Click the attribute in the ``View Attributes and Aliases''
window (the row will become highlighted), (2) Position the
mouse in the ``Destination Address Setup'' window
where you want to place the attribute and then
click the middle mouse button to paste the attribute
into the entry.
nxqddb will automatically format your postcard with the destination address, and vertical separator that you specified in the ``Configure/Report Format Defaults'' -- provided you did *not* choose the Free-form postcard checkbutton.
If you chose the Free-form postcard option on the
Postcard Setup window, then you must enter
the destination address and vertical separator (if desired).
Most users find it convenient to just let nxqddb generate
the postcard destination addresses automatically.
nxqddb provides ``Read from file'' and ``Write to file'' pushbuttons to allow you to read/write postcard messages to and from your hard disk. This feature is convenient because you can avoid typing a postcard message from scratch each time you do a mass mailing. For example, with the AddressBook2 database, you may choose to create generic birthday announcements, club meeting notices, weekly golf statistics, bridge meetings or whatever need you have for mass mailings. Then, when it comes time to do the mass mailing, you can read a previously saved postcard message template and make any necessary changes -- instead of retyping the message from scratch. For details on how to read/write templates, please reference section 4.4.8.
To modify your default postcard setup for Elaine's invitations, click the ``Setup'' pushbutton on the ``Postcard Message'' window to display the ``Postcard Setup'' window shown in figure 7.11.
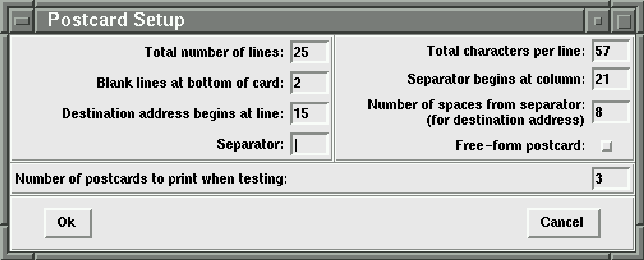
Figure 7.11: Window to adjust the postcard settings
For details on this setup window, reference section 5.5.2.
Once you've entered in the search criteria, results format, and created your postcard message, click the ``Run report'' button to create your report.
At this point, nxqddb generates your report and if matches are found, the standard print dialog box will be displayed. See the chapter on printing (chapter 6) for details on how to operate the standard print dialog window.
Your output, when previewed on screen, should resemble that shown in figure 7.12
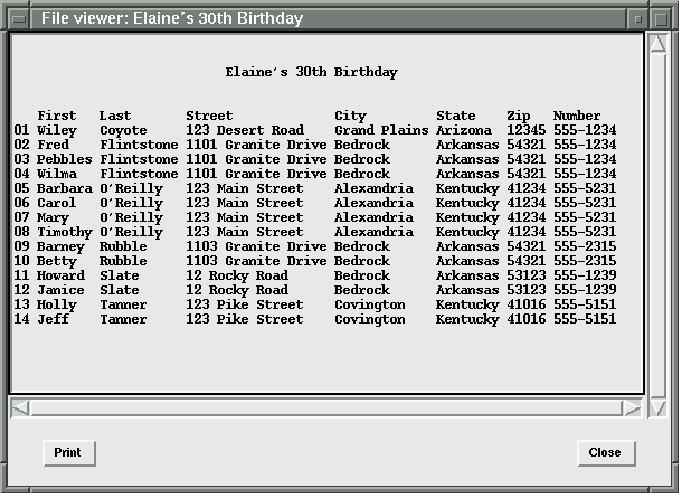
Figure 7.12: Report listing of invitees to Elaine's birthday party
From the preview window, you can print the report by clicking the ``print'' button or dismiss the window by clicking the ``Close'' button. If you click the print button, the standard nxqddb print dialog will appear to prompt you for a destination.
After you leave the listing window, nxqddb continues to the next print option that you have selected. If you only chose the listing option, then you'll be returned back to the main ``Reports'' window. However, in our scenario we also chose to generate postcards; so, nxqddb will now do the postcards. The ``Postcard Message'' window will be displayed as shown in figure 7.9. You can retrieve the text entered earlier by choosing the ``Read from file'' pushbutton to grab the postcard message recorded earlier. After reading your saved postcard message, your window should resemble the one shown in figure 7.13.
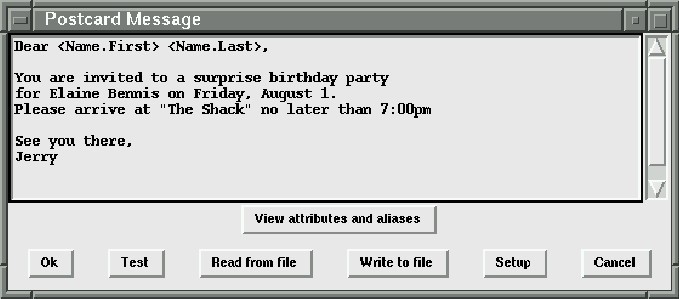
Figure 7.13: Populated Postcard Message Window
Once you have the message text the way you like, choose the ``Ok'' button to start generating your postcards. When finished generating your postcards, nxqddb will display the familiar standard print dialog box (see figure 6.1) to prompt you for a printer destination. Previewing the results should yield a window similar to the one shown in figure 7.14.
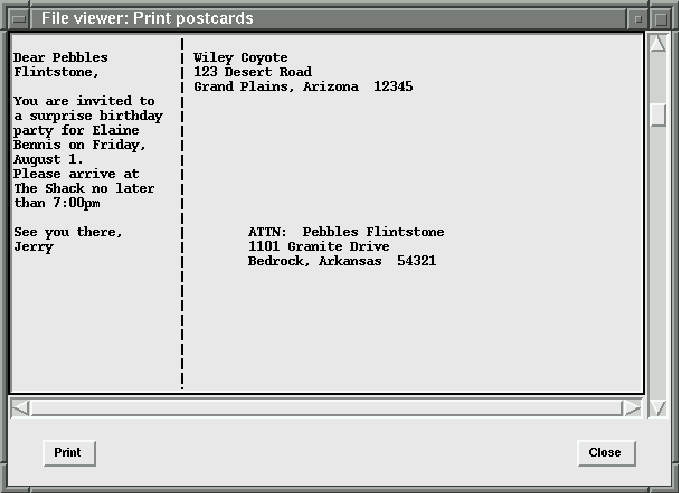
Figure 7.14: Previewing postcards for Elaine's birthday party invitations
Once you've finished generating your postcards, you'll be returned back to the reports window. At this point, you've successfully generated both a report listing and a printed postcard for each person in your AddressBook2 database that satisfied your ``family/friend'' search criteria.
After running your report, you may save your report setup to a file on your hard disk by choosing the ``Write to file'' pushbutton. Then, if you ever need to run this report (or one similar), you can save time by retrieving the file later when you wish to run the report.