In addition to the searches discussed so far, nxqddb provides a powerful mechanism to perform any complex search on your practices database.
This mechanism is named Expert Search.
To perform an expert search, you follow these steps:
The Expert Search window is shown in figure 4.13.
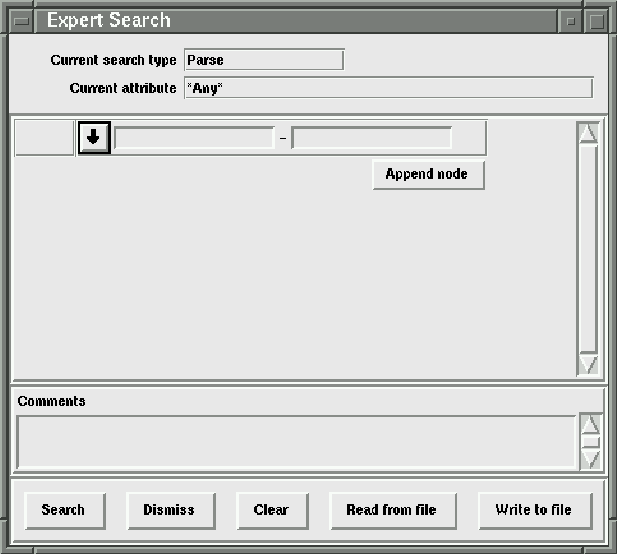
Figure 4.13: Expert Search Window
Lets walk through an example of a simple expert search. For this example, lets assume we want to find all the people whose first name starts with the letter ``A''. There are two ways that this can be accomplished. First, you could just do a simple search by 1) populating ``a.*'' in the First Name field or 2) populating ``aa-az'' (a word range search). However, we want to learn how to do an expert search so we'll take this simple search and comprise an expert search.
The first step to creating an expert search is to display the expert search window. From search mode, click the ``Edit/Expert Search'' menubutton to display the Expert Search window(see figure 4.13).
 The Expert Search window is a modal dialog. Modal dialogs
require that you complete your work within the window before
doing anything else. Meaning, while the Expert Search window
is displayed, you will not be able to do any other operation
outside of the Expert Search window.
The Expert Search window is a modal dialog. Modal dialogs
require that you complete your work within the window before
doing anything else. Meaning, while the Expert Search window
is displayed, you will not be able to do any other operation
outside of the Expert Search window.
Since the Expert Search window is modal, you'll notice that if you move your mouse back to the nxqddb window the cursor will change to an hourglass. This visual clue lets you know that the Expert Search is a modal window. Once you're finished with the Expert Search window, you'll be able to work in the nxqddb window once again.
Click the choicebox (or ``Down Arrow'') pushbutton as shown in figure 4.14. Clicking this icon will display a popup window(see figure 4.15) to allow you to:
![]()
Figure 4.14: Attribute Choicebox button
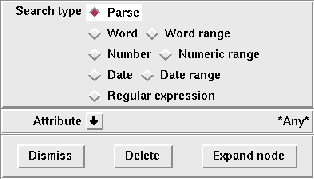
Figure 4.15: Window to choose attribute(or field)
Next, we need to choose the ``First name'' field (or attribute).
Attribute is another name for a field. Attributes are database fields
that store values. Examples of attributes are a person's name, address, pet name,
rabies tag number and so on.
To specify the attribute, click the ``down arrow'' to the right of the attribute label; doing so will display the attribute listbox (see figure 4.16) for you to select the First name attribute.
Use the horizontal and vertical scrollbars to view any text that is
hidden from view.
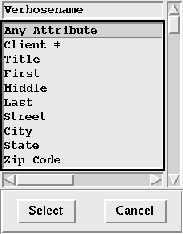
Figure 4.16: Selecting an Attribute (or Field)
In our example, we want to perform a word-range search on the first name field. So, you should click the ``Word range'' radiobutton.
After you've chosen the search field(or attribute), and have clicked the search type radiobutton(e.g. Word-range), position the cursor in the entry boxes to enter your word range. Type the text ``Aa'' in the first entry box. Then, press the tab key to position the cursor in the rightmost entry box. Now type the text ``Az''.
Remember, nxqddb searches are case insensitive. So, you can type
in Aa, AA, aa, or aA and nxqddb treats all of these entries the
same. That is, nxqddb will return instances that match any of the
above patterns.
At this point your expert window should resemble the one shown in figure 4.17

Figure 4.17: Sample Expert Search - Find people whose first name begins with an A
Notice how the two topmost entries ``Current search type'' and ``Current attribute'' are updated to reflect the values chosen for the current field. The current field is the field that contains the cursor.
Click the ``Write to file'' pushbutton to save the expert search that was just created. The standard ``Write to file'' dialog box will be displayed. See section 4.4.8 for details on how to store this search to a file.
At any time after saving an expert search to a file, you can retrieve that search and save some time from manually keying in the search. To retrieve a previously stored expert search, you click the ``Read from file'' button. See section 4.4.8 for details on how to use the standard nxqddb read/write dialog box.
Click the ``Search'' button to invoke the expert search. After you click the ``Search'' button, nxqddb will start retrieving the instances that match your search criteria. In this example, nxqddb will return all the people that have a first name starting with the letter ``A''. The Expert Search modal dialog window will disappear and you will be returned to the nxqddb window. Note, while nxqddb is performing the search, you may see a watch cursor and the status bar may read ``Searching ...''.
The watch cursor is a visual clue that nxqddb is working.
You must wait until the watch cursor changes back to an arrow
cursor before continuing your work.
At any time, you can erase(or clear) your current expert search by clicking the ``Clear'' pushbutton. Note, this button only clears the current session. If you've retrieved the expert search from disk, the disk file will not be removed. If you want to remove the search from the disk file, you must click the ``Delete'' button from either the Read from file or Write to file dialog boxes(see section 4.4.8).
nxqddb allows you the opportunity to store comments with each expert search that you store to a file. Since expert searches can get complicated, you may wish to enter comments explaining what the search accomplishes. To enter comments, just type any text in the Comments text entry box prior to clicking the ``Write to file'' pushbutton. Your comment text will be retrieved into the comments text entry box the next time you retrieve your expert search.
In the previous section, we created a simple expert search that returned all the people whose first name began with the letter ``A''. Now, lets add to our search criteria.
Suppose, we also want to find those people whose last name starts with the letter ``B''. That is, we want all people whose first name starts with an ``A'' OR whose last name starts with a ``B'' Meaning, suppose our records contained the following data as shown in table 4.3.
In our search we want to produce the matches as illustrated in table 4.4.
Notice, the above entries contain either a first name starting with the letter ``A'' or a last name starting with the letter ``B''. In the case of Allen Boone, this instance meets both criteria.
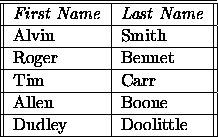
Table 4.3: Input data for expert search example
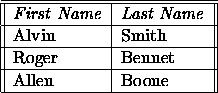
Table 4.4: Results from expert search example
The search criteria discussed in this extended example can
only be accomplished using the Expert search. You can not
get the same results using a simple search; because, when
two fields(e.g. First and Last Name) are populated, nxqddb
will take the intersection. This search example takes
the union of two different search field values.
In the first expert search created, the node was:
Now, we want to append to this node the criteria to also include last names starting with a ``B''.
To do this, click the ``Append Node'' pushbutton. A brand new node(see figure 4.18) will display with a default operation of And. That is, to the right of the ``Down Arrow'' icon, you'll see the word And.
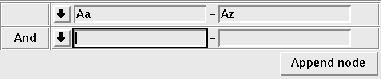
Figure 4.18: Default Append Node
However, in our search, we do not want an And operation; instead, we want to perform an Or operation. We'll see how to change this operation when we enter our second search node - that is, all names starting with the letter ``B''.
Click the choicebox ``Down Arrow'' pushbutton to the right of the ``And'' label to display the window shown in figure 4.19.
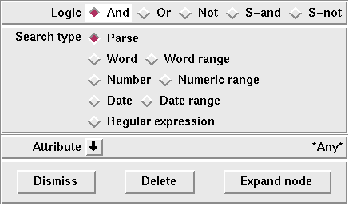
Figure 4.19: Defining the second search node
From the window shown in figure 4.19, perform the following:
At this point, you should have a window that looks like the one shown in figure 4.20.
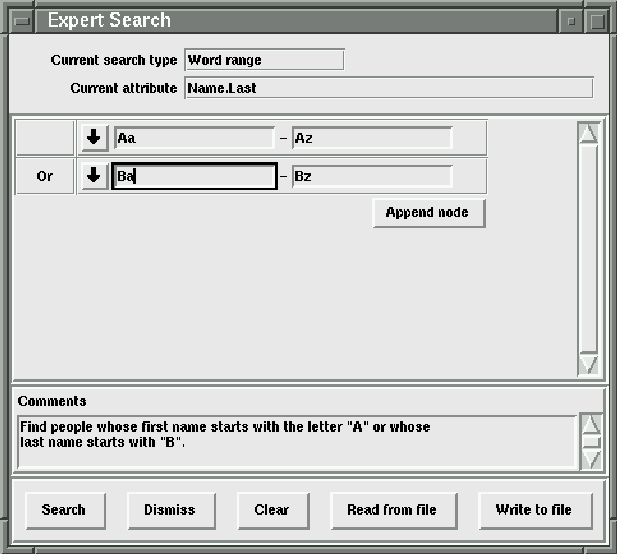
Figure 4.20: Extended Expert Search Example
At any time within the Expert Search window, you can view or modify an existing node. To view the search type and search attribute, position the mouse in the desired field; the top two read-only entries ``Current search type'' and ``Current attribute'' will become populated to show the values.
You can also click the ``Down Arrow'' choicebox button to the left of the node's entry boxes to view or modify the node's logic operation, search type or search attribute.
Suppose you accidentally click the ``Append node''. There are two ways to remove this unwanted node. You can click the ``Clear'' button to start over. This may not be a good move; especially, if you've already created several nodes.
The alternative is to Delete a node. To delete a node, you click the ``Down Arrow'' pushbutton to the left of the node that you want removed. The node's edit window will display to allow you to modify the contents. To actually remove the node, just click the ``Delete'' pushbutton. After doing so, nxqddb will remove the node from the Expert Search window and you may continue with your work.
The ``Expand node'' pushbutton allows you to group search nodes. Suppose for example that you would like to perform the following query: Find all cats and dogs but NOT ones named Gus. Here's the steps to creating this search using the expand node:
The resulting expert search window should look like the one shown in figure 4.21.
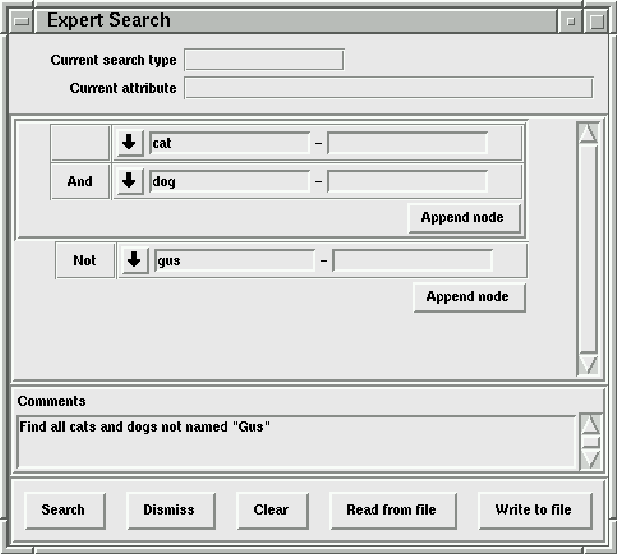
Figure 4.21: Grouped Expert search using Expand node
The expert search window will be automatically dismissed when you click the ``Search'' pushbutton.
The Dismiss button will remove the expert search window and
return you to the main window where you launched the
expert search operation. Be
sure to save your search results (if you so desire), before
choosing the dismiss button.
Alternatively, you may cancel your expert search at any time by simply clicking the ``Dismiss'' button.
The two expert search examples discussed in this chapter have been relatively simple. However, using the expert search tool, you have the capability to perform any type of complex search. In doing so, you may have virtually unlimited amount of search fields and levels of search nodes. However, as the number of search fields and levels increase, so does the complexity of your search. For example, reference figure 4.22 for an example that contains a more complicated expert search than the two we've seen so far in this chapter.
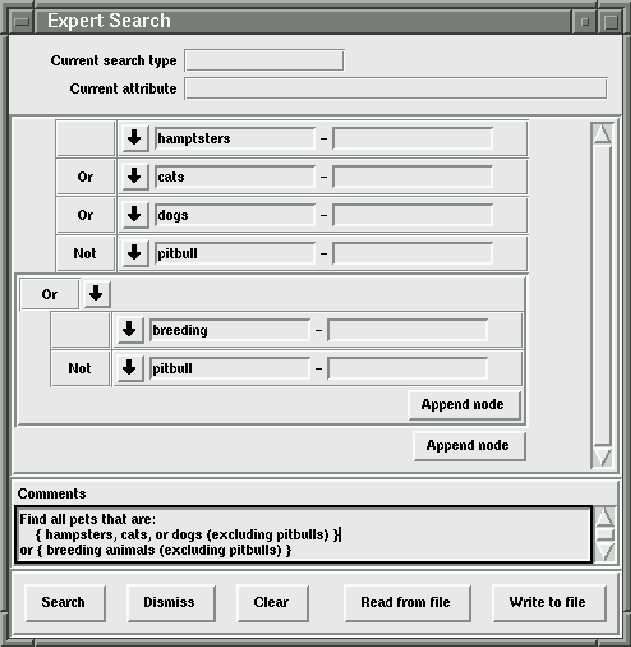
Figure 4.22: More complicated expert search
The best way to master expert searching is through experimentation. Start off with simple searches and progress into more complicated searches. With a little time and effort, you'll quickly become familiar and will appreciate nxqddb's expert search technique.