next up previous contents index
Next: 5.6 Fonts Up: 5 Configuring nxqddb Previous: 5.4 Search Results

5.5 Report Format Defaults

  Clicking the ``Configure/Report Format Defaults'' menubutton  displays the cascading menu shown in figure 5.5.

  figure1272
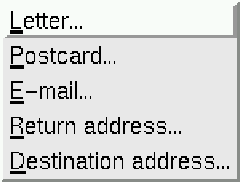
Figure 5.5: Menu for setting report format values

From the menu shown in figure 5.5 you can access the screens that tell nxqddb how to:

Format letters
Choose the format for your letters. For example you can specify (1) the number of lines, (2) address location, etc.
Format Postcards
Similar to the letter setup window, you can customize the appearance of your postcards.
Handle email
Tell nxqddb what attribute holds the email address and what mail program to use on your system.
Return address
Tell nxqddb what return address to include on postcards and letters.
Destination address
Tell nxqddb what destination address to include on postcards and letters.

Each of these options are discussed in detail in the following sections.

5.5.1 Letter Format

   Choosing the ``Configure/Report Format Defaults/Letter format'' menubutton displays the window shown in figure 5.6.

  figure1289
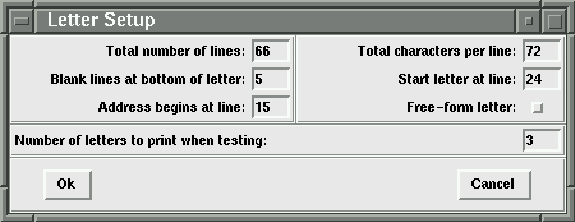
Figure 5.6: Window to customize appearance of letters generated by nxqddb

Each of the fields shown in the reminder card setup window is described below:

Total number of lines
This field tells nxqddb how many lines are contained on the letter page.

Blank lines at bottom of letter
This field tells nxqddb how many lines to leave blank at the the bottom of the letter page.

Address begins at line
This field tells nxqddb on what line the destination address should begin printing.

Total characters per line
This field tells nxqddb how wide your letter is; in other words, this field tells nxqddb how many characters fit on a line.

Start letter at line
This field tells nxqddb at what line to start the letter. In other words, the value of these field tells nxqddb how many blank lines should appear at the top of the letter.

Free-form letter
This checkbutton tells nxqddb to produce free-form letters when the checkbutton is turned on.

Number of letters to print when testing
This field tells nxqddb how many letters should be printed when the user clicks the Test button from the Report Generation window. This number should be a small number, usually less than five or so. This feature is nice because you can generate a test print run to check your letter setup and to verify that the printouts are working correctly.

After you've entered your setup information, you can click the Ok button to save your setup or click the Cancel to cancel without saving your setup.

5.5.2 Postcard Format

      Choose the ``Configure/Report Format Defaults/Postcard Format'' menubutton to display the window shown in figure 5.7.

  figure1315
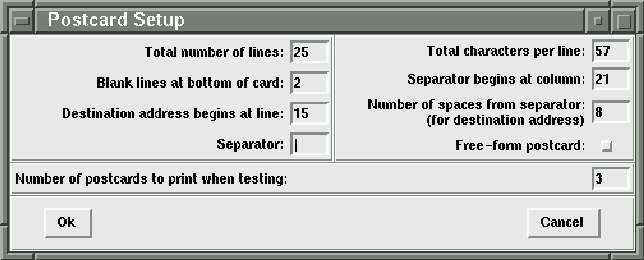
Figure 5.7: Window to customize appearance of postcards generated by nxqddb

The options to formatting postcards are similar to the options of formatting letters. Each of the fields shown in the postcard setup window is described below:

Total number of lines
This field tells nxqddb how many lines are contained on the postcard.

Blank lines at bottom of card
This field tells nxqddb how many lines to leave blank at the the bottom of the postcard.

Destination address begins at line
This field tells nxqddb on what line the destination address should begin printing.

Separator
The separator is a character that separates the postcard text from the destination address. nxqddb defaults the separator to a vertical bar(|).

Total characters per line
This field tells nxqddb how wide your card is; in other words, this field tells nxqddb how many characters fit on a line.

Separator begins at column
This field tells nxqddb where to place the vertical separator on the reminder card.

Number of spaces from separator(for destination address)
This field tells nxqddb how many spaces to place to the right of the separator before printing the destination address.

Free-form postcard
This checkbutton tells nxqddb to produce free-form postcards when the checkbutton is turned on.

Number of postcards to print when testing
This field tells nxqddb how many postcards should be printed when the user clicks the Test button from the reports window. This number should be a small number, usually less than five or so. This feature is nice because you can generate a test run of reminder printouts to check your postcard setup and to verify that the printouts are working correctly.

After you've entered your setup information, you can click the Ok button to save your setup or click the Cancel to cancel without saving your setup.

5.5.3 Email Format

     Choosing the ``Configure/Report Format Defaults/E-mail format'' menubutton displays the window shown in figure 5.8.

  figure1342
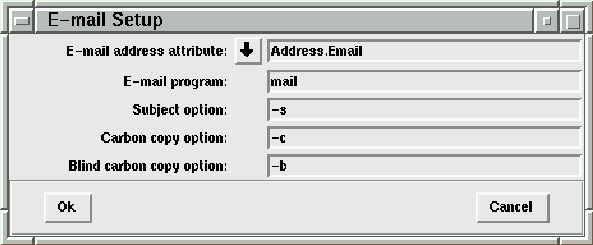
Figure 5.8: Window to customize E-mail settings

Email address attribute


From the E-mail Setup window, you have the ability to specify which attribute contains the Email address(es) that you want to receive mail generated from nxqddb reports. To specify an attribute, you simply key the fully qualified attribute name in the text entry. Or, you can click the ``down arrow'' button to the left of the entry to choose from a list of

  figure1351
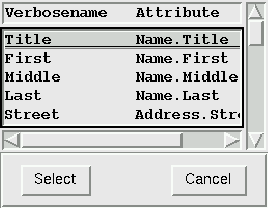
Figure 5.9: Pulldown listbox of available attributes to choose from

attributes(see figure 5.9). Typically, this attribute is usually called something like ``Email'' or a similar name that you used when you created your Schema file.

E-mail program

  You can tell nxqddb which mail program you want to be launched whenever you create Email correspondence reports. Typically, most users will be okay with the default mail program; however, you can use whatever mail program you desire.

E-mail subject, carbon copy, blind carbon copy options

 This field tells nxqddb what switch option your mail program uses for the subject content. The default value is ``-s''; this value works just fine for the standard UNIX mail program. If your mail program expects a different switch option for specifying the subject, you would enter that value here. At the time you run your Email report, nxqddb will prompt you for the subject and content of the mail message(s) along with the carbon copy and blind carbon copy distribution list.

If you click the ``Ok'' button, your settings will be remembered for that session. Remember, you must choose ``Configure/Save Personal Configuration'' or ``Configure/Save Global Configuration'' to permanently remember your new settings.

If you click the ``Cancel'' button, your modifications will be disregarded.

5.5.4 Setting your return address

   Choosing the ``Configure/Report Format Defaults/Return address'' menubutton displays the window shown in figure 5.10.

  figure1370
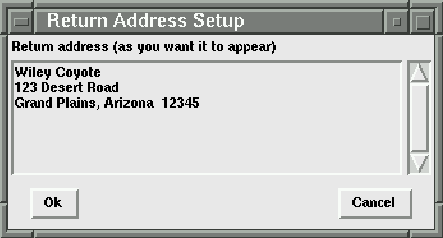
Figure 5.10: Window to customize your return address

From this window, you simply enter the text for a return address. For example, suppose you live on Hermes Avenue in Covington, Kentucky; then you might enter the following text in the window's text entry and then choose the ``Ok'' button to save your results:

John and Jane Doe
3205 Hermes Avenue
Covington, Kentucky  41016

Remember, you must choose ``Configure/Save Personal Configuration'' to permanently save your settings.

5.5.5 Setting your destination address layout

    You can tell nxqddb the attributes that comprise your destination address for your reports. To accomplish

  figure1380
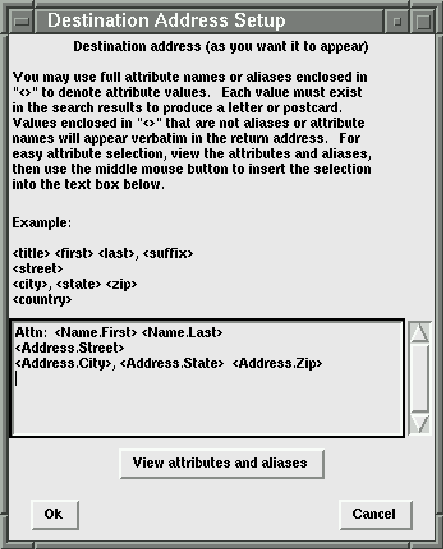
Figure 5.11: Window to customize your destination address

this, choose the ``Configure/Report Format Defaults/Destination address'' to display the window shown in figure 5.11. There is text contained on this window to instruct you how to complete your destination address entry. Simply perform the steps listed in this window to tell nxqddb how to generate and print the destination addresses found from producing an nxqddb report. For details on how to generate reports, please reference chapter 7 Generating Reports.

View Attributes and aliases

  nxqddb provides a convenient method for you to complete your return address. Following these steps makes it easy for you to enter your destination address layout and also reduces the chance of you making any typing mistakes:

  1. From the Destination Address Setup window, click the

      figure1396
    Figure 5.12: View Attributes and Aliases Window

    ``View Attributes and aliases'' button. The window shown in figure 5.12 will be displayed to allow you to view all of the attributes defined in your database.

  2. For each field in your destination address, do these steps: (1) Click the attribute in the ``View Attributes and Aliases'' window (the row will become highlighted), (2) Position the mouse in the ``Destination Address Setup'' window where you want to place the attribute and then click the middle mouse button to paste the attribute into the entry.
  3. After completing your destination address, choose the ``Ok'' button to tell nxqddb to save your setting. Remember, you must choose ``Configure/Save Personal Configuration'' to permanently save your settings when you leave nxqddb. If you choose ``Cancel'', nxqddb will disregard your modifications to the destination address.

next up previous contents index
Next: 5.6 Fonts Up: 5 Configuring nxqddb Previous: 5.4 Search Results

Herrin Software Development, Inc.