In the previous section, you learned how to generate a listing report as well as mass mailings for postcards. This section discusses nxqddb's useful Email reporting feature.
You can setup a report such that each record(i.e. person) found on the report is automatically E-mailed a customized mail message. An overview of the steps to perform Email mailings is described below:
 For the E-mail checkbutton to become highlighted, you must be
sure that you include your ``E-mail'' in the ``Print'' dialog
box when you performed the ``Results format'' operation. Remember,
you specify the E-mail attribute when you configured nxqddb via the
``Configure/Report Format Defaults/E-mail format'' menubutton.
For the E-mail checkbutton to become highlighted, you must be
sure that you include your ``E-mail'' in the ``Print'' dialog
box when you performed the ``Results format'' operation. Remember,
you specify the E-mail attribute when you configured nxqddb via the
``Configure/Report Format Defaults/E-mail format'' menubutton.
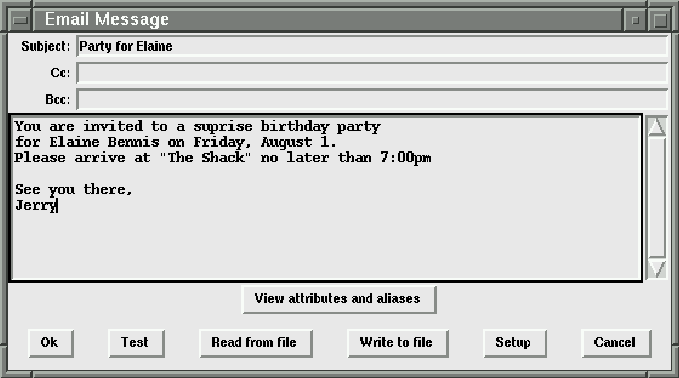
Figure 7.15: Sample Email Message Setup
From this window, you specify a subject by keying into the ``Subject'' entry. You customize your mail message by typing into the text entry. To ease the task of specifying your attributes, nxqddb provides the ``View attributes and aliases'' window.
To avoid silly input errors when creating your E-mail
message, nxqddb provides a ``View attributes and aliases''
button to allow you to conveniently paste the attributes
into your message entry. To do so, follow these steps:
(1) Click the attribute in the ``View Attributes and Aliases''
window (the row will become highlighted), (2) Position the
mouse in the text entry window
where you want to place the attribute and then
click the middle mouse button to paste the attribute
into the entry.