In this section, we'll refine our AddressBook with the following updates:
On the nxqddb window, position the mouse over the ``First'' label
and then <Control-3> click the mouse. To perform this
operation, you press and hold the control key and then click
the right(or left for left handed users) mouse button. The configuration window shown
in figure 2.8 will be displayed.
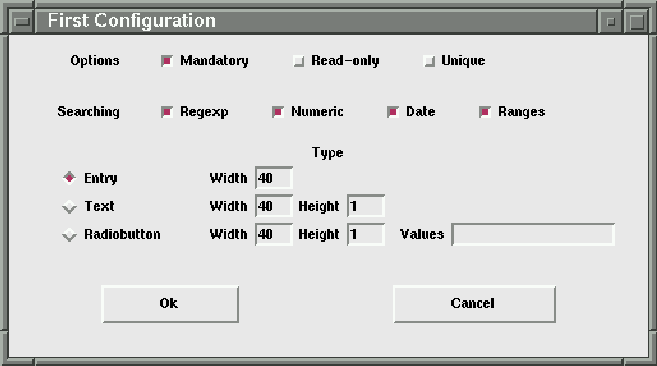
Figure 2.8: Configuring individual fields
To make the First name field mandatory, click the ``Mandatory'' checkbutton and then press the ``Ok'' button to dismiss the configuration window. When you return back to your nxqddb window, you'll notice that the First name entry now has a darker shaded background color. This visual cue tells you that you cannot enter a record in your addressbook without first populating the required First name field.
 Required fields are visibly obvious in nxqddb because
they have a darker shaded entry background than
non-required fields. Before saving or modifying
a record, you must be sure that all required fields
contain text(at least one character).
Required fields are visibly obvious in nxqddb because
they have a darker shaded entry background than
non-required fields. Before saving or modifying
a record, you must be sure that all required fields
contain text(at least one character).
To make the Last name field mandatory, repeat the same
steps as described for the First name except initially
<Control-3> click over the Last name field label.
As in the previous section, we want to display
the field configuration window by <Control-3> clicking
the mouse on the ``Sex'' label.
By now, you'll be familiar with the configuration window shown
in figure 2.8.
To turn the Sex field into a radiobutton, perform these steps:
Male Female ``Do not know''
Figure 2.9: Entering radiobutton names that have spaces
Follow the same steps mentioned above to convert the ``Relation'' attribute into radiobuttons: Family, Friend, Business and Other.
Notice in figure 2.11, the radiobuttons do not line up with the rest of your nxqddb fields. To align radiobuttons, simply change the height of the radiobuttons to 2 or more rows. For example, to ensure that the ``Sex'' radiobuttons are vertically aligned, do these steps:
<Control-3> click the mouse on the Sex label to
display the configuration window.
<Control-3> click the mouse on the Comments label to bring
up the familiar field configuration window.
To make the Comments field a text area with a height of four(4) lines,
just do these simple steps:
After reconfiguring fields, your nxqddb window will be automatically updated to reflect your recent changes. You may have to resize the window to view any hidden changes that may occasionally occur
when you enlarge widgets(i.e. increase text area height). To quickly resize the window, left-click on the maximize window icon(see figure 2.10).
After making the changes from this section, your ``nxqddb AddressBook2'' window should resemble the one shown in figure 2.11.
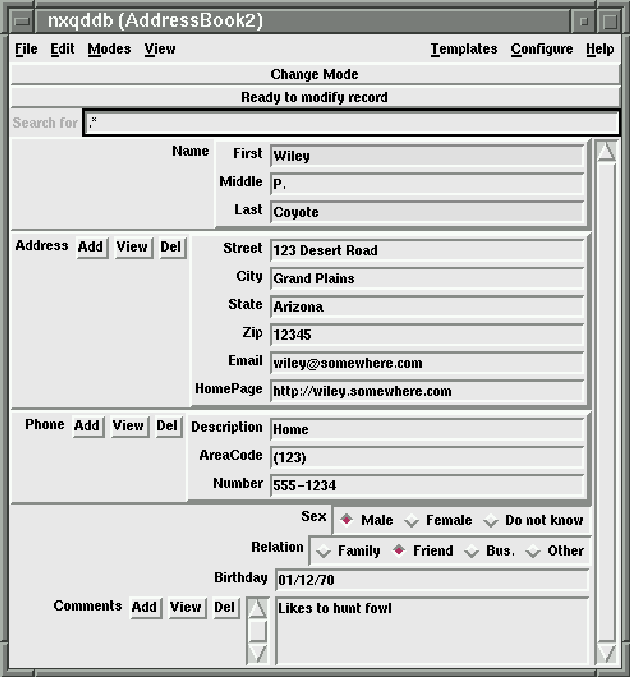
Figure 2.11: Revised AddressBook2
In this chapter, we have made several changes to the display configuration of our addressbook. In order to have these changes present after we exit nxqddb, you must be sure to save your changes.
You can save (1) personal or (2) global configuration or (3) default settings by selecting the appropriate Cofigure menubutton.

Figure 2.12: Personal Configuration Saved
When you click one of these ``Configure/Save'' buttons, the status bar will be updated accordingly (see figure 2.12). Reference section 5.2 for details about each of these configurations.
If you have``Auto-Save Personal Configuration'' turned on, nxqddb will automatically save any configuration changes that you have made in your current session before you exit nxqddb.
Reference chapter 5 for a complete discussion of saving/loading configuratons as well as a discussion of all of the nxqddb configuration features.