Nxqddb is a generic user interface written at a much higher level than the text-based interfaces. It makes use of the graphical facilities in the X Window System. Because it is fancier, and because many more software levels are involved (such as the Tcl interpreter, the Tk interpreter, and the Fx library), nxqddb is slower than the text-based user interfaces. However, the reduction in speed is amply repaid in ease of use and extra function.
Nxqddb parses queries specified in attributes, provides reporting/viewing facilities, and generates a tailor-made graphical interface from the Schema file. Figure 3.1 shows nxqddb's automatically-generated interface for the Library relation defined earlier.
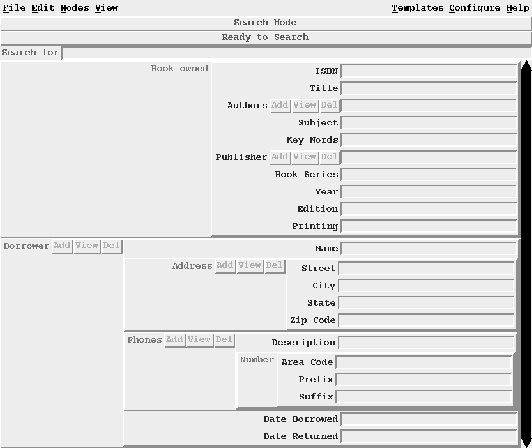
Figure 3.1: nxqddb interface for Library relation
Nxqddb lets you add, modify, and search for tuples within the relation. Its extensive configuration options let you customize the graphical presentation of data on a relation-by-relation basis.
When you invoke nxqddb, you see a screen similar to the one shown in Figure 3.1. The buttons at the top give you access to commands, and the mode line directly underneath them tells you what nxqddb is doing.
There are four modes: Search, Add, Change, and Read-only. When nxqddb starts, it enters Search Mode to let you search for tuples. You can press the Modes button (actually, you click the mouse when the screen cursor is on the menu button) and choose Add Mode if you prefer. You automatically enter Change Mode when a search identifies a tuple. Changes you make to the tuple only take effect when you save the tuple. You can select Read-only Mode to allow other users to modify tuples while you are just browsing. Qddb does not allow a tuple to be subject to change by more than one program at the same time (even when the relation is shared on a network through the network file system).
The menu bar at the top of the nxqddb window displays
the following buttons:
Some menu items are not available in some modes; those items are stippled
(displayed in a less readable color) and disabled when not available.
You can bring up a menu associated with a menu button either by pressing the
button or by holding down the <Alt> key
and typing the character that is underlined in the desired menubutton.
(You may need to configure your X session to establish an <Alt> key; it
needs to have Mod2 set and nothing else.)
Once the menu is displayed, you can select an item by typing the underlined
character in the item's label. For example, to
save a tuple, you may press <Alt>fs (hold down the <Alt> key,
then press f and s.)
Most of the display is dedicated to lines for attributes, with the attribute name on the left and a place to enter information on the right. Information you enter on the right guides a search (in Search Mode) or modifies the value of the current tuple (in Change Mode or Add Mode).
Information is generally placed in one-line entry boxes, but you can configure nxqddb to use multiple-line text boxes or multiple-choice radio buttons on an attribute-by-attribute basis.
To direct nxqddb's attention to an entry or text box, you can either click on the box or type the tab or down-arrow key until the vertical cursor appears in the box you want. (Shift-tab and up-arrow move backward through the boxes.) Once attention is on an entry box, characters you type are placed in that box. Some keystrokes are treated specially, as shown in Table 3.1. (This table is also available via the Help button.) These interpretations are similar to the default bindings of the emacs text editor.
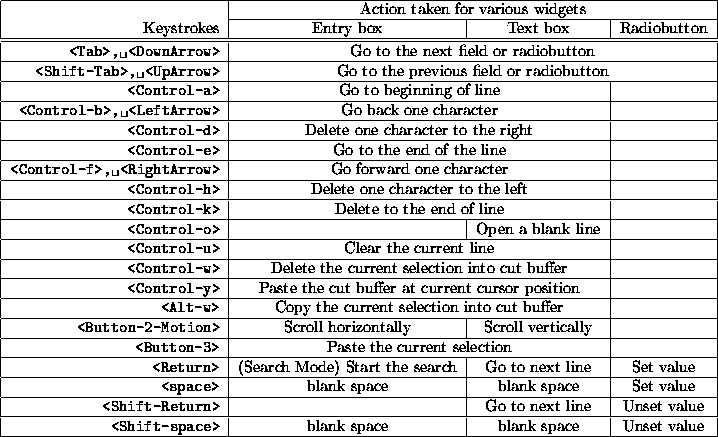
Table 3.1: Key interpretations
Only one instance of each expandable attribute is displayed at one time. Each expandable attribute has three buttons next to its label. The Add button introduces a new, initially empty, instance of the attribute. The View button displays a box listing all instances of the attribute; you may select one to display. The Del button deletes the instance that is currently being displayed.
To add a new tuple, you enter Add Mode by clicking the menu button called Modes, then selecting Add Mode. You can view all instances that you have added, just as in Change Mode. When you have finished adding your tuple, click the File button and choose the Save option. The screen will be cleared (if Auto-Clear is enabled) to prepare for another added tuple.
The simplest way to search is to enter search keys in one
or more attributes and then either type <return> or activate the Search
menu
item in the Edit menu. Qddb will search for all tuples that have all the
specified words in the indicated attributes.
The search ignores the case in which you specify the words and the case of the
data. A word in the data is any string of contiguous alphanumeric characters
within a single attribute![]() .
.
Actually, the result of a search is not a set of tuples, but rather a set of
rows.
A row is a view of a tuple that restricts each multiple-instance attribute
to one of the instances.
If none of the attributes has multiple instances, a tuple has only one view,
and hence, only one row.
But if you search in the Library relation for Title = "Is Sex Necessary",
the tuple that matches has two authors: E. B. White and James Thurber.
Therefore, there are two matching rows, one with
Authors = "E. B. White" and one with Authors = "James Thurber".
If the book has been borrowed by two friends, then the tuple has four rows.
If one of the friends has two addresses, then the tuple has six rows.
If a search yields more than one tuple, you must choose which tuple you wish to see. More generally, if a search yields more than one row, and the rows are distinguished either by coming from different tuples or by different instances of significant attributes, you will need to make a choice. (You can configure what makes an attribute significant; see Section 3.2.6.)
For example, if Sarah has two addresses and both name and address attributes are significant, then a search that matches a book borrowed by Sarah will generate two rows, one for each of her addresses. If only one of those addresses matches your query, then only one row is generated. If addresses are not significant, then no matter how many addresses match the query, only one row results.
If only one row is generated by a search, nxqddb will display the single resulting row by copying its data into the attributes shown on the screen and then enter Change Mode.
If a search yields more than one row, nxqddb produces a results box. It has one column for each significant attribute of the relation. (Again, you can configure this set, as you will see in Section 3.2.6.) The results box shows one line for each row returned by the search. (If there are too many rows, only some are shown and a scrollbar is provided to let you see the rest.)
You may select a line (using arrow keys or by clicking the left mouse button), which causes the associated row to be displayed in the main window. The results box will then disappear, and you may update the tuple whose row is displayed. You may view other rows of the same tuple by clicking on View buttons for expandable attributes.
If you pin the results box (there is a check button for that purpose in the results box), it will persist even after you have selected a row. You can select one row after another, modifying each one if you like. The results box will persist until you unpin it, cancel it, or start a new search.
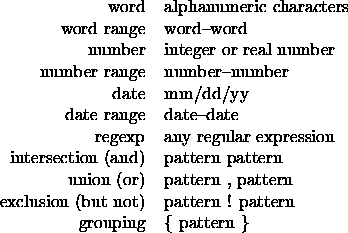
Nxqddb can perform fancier searches than we have shown so far. (Still, it does not use the full searching capabilities of Qddb.) A query in nxqddb is a list of atoms joined by operators. Words are one form of atom; here is the full list of search patterns:
A single atom could be interpreted in different ways. First, nxqddb checks for a ``-'' in the atom and checks the string types on either side. If both strings appear to be either a word, number, or date, then the appropriate range searching method is used. Otherwise, nxqddb attempts to treat the string as a word, a number, or a date, in that order. If all fail, nxqddb treats the atom as a regular expression.
Search patterns may be specified in any attribute field and/or in the attribute-independent Search For field. The resulting query is the logical intersection (and) of the individual queries in each field.
White space is important: Don't put any around the ``-'' that indicates a range, but do surround the union and exclusion operators with space.
The operators for intersection, union, and exclusion have identical precedence and associate to the left. Here is a complex query in a particular attribute:
{ joe , henry { amy john } a-z .123. { 1 2 { 3 4 } } }
This pattern looks for rows that have values matching a complex criterion for this attribute. The value of the attribute must either contain ``Joe'' (case is insensitive) or ``Henry'', and it must also contain all of ``Amy'', ``John'', some 1-letter alphabetic word, a word containing an arbitary character followed by ``123'' followed by an arbitrary last character, a ``1'', a ``2'', a ``3'', and a ``4''. These various words may be present in any order.
Here are more search examples.
Search for rows with either the words ``eric'' and ``herrin'' or the words ``raphael'' and ``finkel'':
{eric herrin} , {raphael finkel}
Search for rows with the words ``herrin'' or ``herron'' but not the word ``eric'':
{herrin , herron} ! {eric}
Search for rows with ``eric'' and ``herrin'', then perform a union with rows containing ``raphael'', then remove all rows containing ``finkel'':
{{eric herrin , raphael} ! finkel}
Search for rows containing either a date from January 1, 1994 through June 1, 1994 or the words ``henry' and ``blue,'' but not ``leslie'':
{1/1/94-6/1/94 , {henry blue}} ! leslie
Search for rows matching the regular expression
(.*)abc(.*) or containing ``special'' and ``customer,''
but not containing the word ``delinquent.'' Merge that result
with rows containing words ranging from ``ba'' through ``bz'':
{{(.*)abc(.*) , {special customer}} ! delinquent} , ba-bz
Here is a final complex example:
    { { leslie ! walker } , { leslie walker junior }
      { 01/01/94-12/31/94 ! 01/20/94-01/24/94 }
      { 1000.00-1500.00 }
    }
After you have used nxqddb for a while, you may find that you would like to perform searches that are more complex than the simple interface allows. For this reason, nxqddb has the expert search query aid available from the Edit menu. With the expert search, you can define a fully parenthesized expression composed of sub-queries. For each sub-query you can specify an attribute, a type of search, and a boolean operation.
Figure 3.2 shows a user-defined expert search for the Library relation. Each query is defined by its components. Each component may be comprised of sub-queries. The components are traversed from top to bottom, so queries closer to the top of the form are performed first. You can append a new sub-query to a component by selecting the Append button at the bottom of the component. You can set the attribute, search type, and boolean operation (if applicable) of a sub-query by selecting the Down-arrow button to the left of the sub-query's entry boxes (a pull-down menu will appear.) If you select the ``Expand Node'' button on this menu, the sub-query will expand into a component comprised of two sub-query forms.
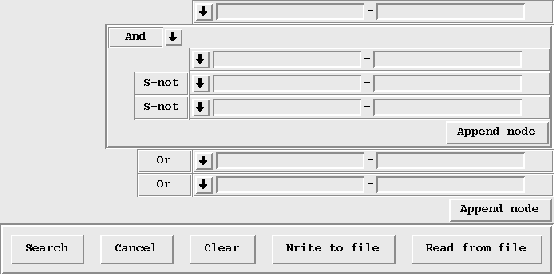
Figure 3.2: nxqddb ``expert search'' query aid
The search types available for the expert search are the same as the simple search. The difference is you can force a particular search type with an expert search. For example, you might want to search for a date range ``today -1 month'' - ``today'' to search a date range relative to the current date. The simple search's parser will interpret ``today -1 month'' as multiple words rather than the left-hand side of a date range.
Boolean operations may be one of:
Strong operations are usually used only when both operands are queries confined to the same attribute. For example:
Name.First = "Joe.*" S-not Name.First = "Joey"
will produce all tuples containing a first name beginning with ``Joe''
excluding the single name ``Joey''. Strong operations are used
when you want to perform operations on the same instance of
an attribute in each matching tuple. Weak operations are used
when you want to perform operations regardless of the instance
in which the match occurs. So, if Name.First is an expandable
attribute, the query (using a weak Not operation):
Name.First = "Joe.*" Not Name.First = "Joey"
will produce all tuples containing at least one instance of
Name.First matching Joe.* but containing no instances
of Name.First matching Joey.
When Search Results are displayed, you may select a row. Once a row is selected, nxqddb will bring the associated tuple into the main window for viewing and modification. It will switch to Change Mode. If you modify the tuple, you will be prompted to either save or discard the changes whenever you try to switch to another tuple or go to Search Mode or Add Mode.
Nxqddb lets you configure attribute presentation, fonts, how search results are formatted and sorted, how multiple instances are formatted and sorted, and whether fields are automatically cleared when you enter Search and Add Modes. You can save the current configuration so that the next time you run nxqddb on the same relation, you get the same configuration back.
You can configure the presentation of each leaf attribute
by clicking <Control>-Button-3 on a leaf (that is, non-structured)
attribute's label. You can set the style (entry, text, radio button),
the width, and whether the attribute is mandatory and/or read-only.
Figure 3.3 shows the presentation-configuration window.
Radio buttons (multiple choices) present a fixed set of values; you must
specify the valid values in a space-separated list.
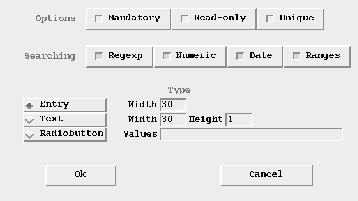
Figure 3.3: Configuring Entries
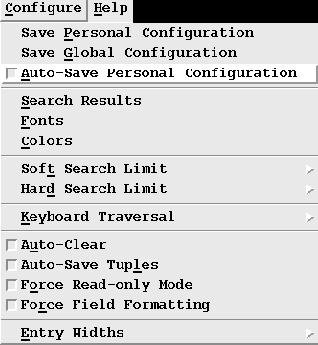
Figure 3.4: The Configure submenu
Most other configuration is accessed through the Configure menu (see Figure 3.4). The Configure menu has several check buttons (square boxes with a label on the right) that allow you to turn on and off various options. When you click on one of these check buttons, you toggle its state to either on or off. The check button's square box highlighted when the option is set.
The auto-save personal configuration option tells nxqddb to save the current configuration as your ``personal'' configuration for this relation when you exit nxqddb. The auto-clear option has nxqddb clear all search parameters when entering Search Mode and all attributes when entering Add Mode and after saving an added tuple. The force read-only mode option makes nxqddb enter Read-only Mode instead of Change Mode whenever a tuple is selected from the search results.
Searches can result in a great number of tuples that match the search criteria. Nxqddb saves all the matched tuples in memory. To limit the amount of data a search can produce, the configure menu lets you set two limits via submenus. The soft search limit is the number of tuples that can be matched before nxqddb warns you and asks if you want to continue with the search. The hard search limit is the number of tuples that can be matched before nxqddb will stop searching altogether. These options are especially useful for naive users who are not yet used to specifying highly constrained searches.
Searches that match more than one significant row give rise to results boxes. An expandable attribute has a View button that you can press to get an instances box showing all the instances. Results and instances boxes have the same appearance: Attributes are listed horizontally, and each row presents values of those attributes pertaining to one row.
You can configure results boxes and instances boxes.
From the Configure menu, you can select Search Results and get a configuration
window similar to the one shown in Figure 3.5 for
the Library relation.
You get a configuration window for instance boxes by clicking
<Control-Button-3> on the expandable attribute's label.
Both kinds of configuration window have the same look and feel.
You can select which attributes should be shown in results and instances boxes by clicking on attributes in the Print or Don't Print regions and moving them to the other region by clicking on the left or right arrows. By dragging the mouse with the left mouse button pressed, you can select multiple contiguous attributes to move. You can decide what left-to-right order to display the selected attributes by clicking on them and moving them up or down by clicking on the up or down arrows. You can assign a width to the column dedicated to each attribute by clicking on it and then entering the width in the entry box below. (0 indicates width adequate to present the data; this is the default.) You can specify whether data for each column should be left or right justified, and you can specify a separator string between columns. You can determine the order in which the lines of data will be presented by modifying the order of the attributes in the Sort-by region. Nxqddb will sort by the higher attributes first. For each attribute, you can select ascending or descending order.
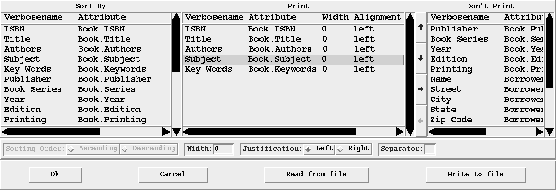
Figure 3.5: Search Results Configuration for the Library Relation