To add new entries, follow these steps:
When nxqddb first appears, you will be placed in ``Search Mode'', the default mode. In order to add an entry, you must first get into ``Add Mode''. To tell nxqddb to switch to ``Add Mode'', click the ``Modes/Add Mode'' menubutton from the menubar. You'll know you are in add mode when the status bar(see figure 3.2) displays the add mode message.
All nxqddb entries uses emacs-style key bindings. See table 3.1 for a list of the nxqddb key bindings.
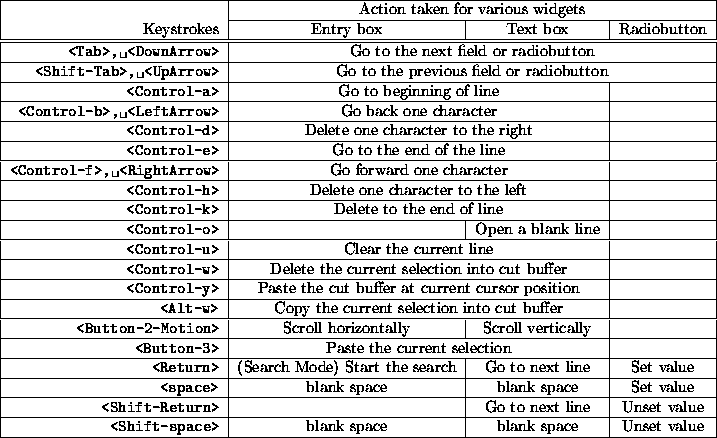
Table 3.1: Key interpretations
In add mode you can move among the entries by:
Once you have keyed in the information for the record you wish to add, the ``File/Save'' menubar option(see figure 3.3)
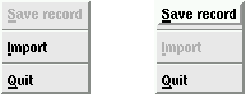
Figure 3.3: File Pull-down Menu
becomes enabled. Click this menubar button to save your entry. nxqddb will save your information and the status bar will be updated to reflect that you've added a record(see figure 3.4).
![]()
Figure 3.4: Service saved status message
Additionally, the window will be prepared for your next entry.
Once you've entered your record(s), you can change to another mode
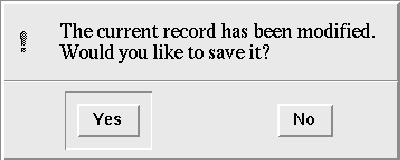
Figure 3.5: Confirm Save Dialog
by clicking one of the Modes' menubuttons or exit the nxqddb application by choosing the File/Quit menubutton. If you've entered any text while in Add mode, nxqddb will prompt you with a confirmation dialog box(see figure 3.5). This confirmation dialog box serves as a precaution to warn you before leaving Add mode without saving your input. You can choose not to have this dialog box appear by turning on the ``Auto-Save Tuples'' option (see chapter 5.12 for details.)